
While there are plenty of home automation lighting projects out there to help you automate and control LEDs, I wanted to control something physical within the home – curtains or blinds. Check out my balenaLabs residency project where I prototype a way to automate curtain or blind movement to adjust the heat and light that enters my home.
Why is this important?
Circadian rhythm is an important part of your health. TL;DR: you should sleep in the dark and get up in the light. When there are some light sources just outside your window, it becomes difficult to achieve.
Ideally, you want to close the curtains before sleep, but to wake up in natural sunlight, you’d have to open the curtains while you are sleeping. This project aims to automate the opening and closing of curtains to assist in helping a person sleep and wake in the most ideal scenario.
balenaLabs residency
My prototype is part of the balenaLabs residency program, where balenistas take on a physical computing project to learn more about balena and various hobbyist or industrial use cases. You can check out all kinds of build logs and notes on our Forums.
Also, this program isn’t just for balena’s teammates – any community member can join in on the fun. Share your project on the Forums to let us know what you’re working on. We’re here to help!
Background
With temperature and light sensors being common use cases, a large part of this prototype focuses on actually moving the shades, the automation of the actions and the connection to the sensor data.
Let’s walk through a few options and approaches that you might find. Or, jump straight to the build steps if you just want to build this project. There’s also a video demo to check out if you want to see the first version of this project in action.
Use a prebuilt/complete setup like Zigbee
Zigbee has a mature product line and is a complete system, including a special kind of motorized curtain holder. However, it includes a fixed form factor that may not fit some homes. There’s also a chance that you might not be able to integrate it with your existing manual curtain. Also, no one likes unencrypted connections, even if it is just about some piece of fabric covering your window.
I chose not to use this method since I did not want to take something apart to create my project.
Use a single driver /create your own driver
To make your motor move based on your logic, it has to be connected to your hardware, which contains that logic in order to receive signals to move and provide power to do so.
Okay, but do you speak “stepper motor”? What kind of signals do I apply to the wires of the motor to move it into the position I want?
Luckily each motor has its specification that helps you figure out how to drive them “raw.” While it sounds fun, the reason I did not go on this path is that it probably would add more configuration and testing time to this project. Even if the result is good for the chosen motor, it’s good only for that one motor.
The point of this project is to create a solution that would be adaptable and widely available for others.
Taking it one step further, there are premade integrated circuits available to buy that are specifically made for this use case. This means that the solution includes a way to signal the motors, but you need to put it on a board, and do almost as much work to control the integrated circuit (IC) as you would do with the motor directly, and take care of the power source too.
Enter the Adafruit motor hat
After all of that initial research, I ended up with the Adafruit motor hat, which solves multiple things. It can drive multiple kinds of motors, including simple DC motors or stepper motors, so the compatibility restriction is lifted. It also routes the power, removing one more thing to think about. It can also be stacked, though I’m using just one in this project. You can use up to four HATs driving up to eight stepper or 16 DC motors.
Adafruit has a nice Python library to handle the motors so I don’t need to find out which pin to set to what when– I just call the right function and it moves.
Before I ended up with the HAT, I wondered if it would conflict with the sensors, especially if they occupy the same pins. This could have been a reason to go with a single driver IC. In the case that they are occupying the same pins, we can explore something similar to the balena-sense setup, where sensors can be daisy-chained. As I mentioned earlier, the HATs can be stacked, and because they use I2C too, they should not conflict with each other.
Project setup
Here’s a look at the hardware and software required for getting started.
Hardware used
This is the hardware list specifically for my project and my curtains. Your mileage may vary, but this list at least gives an idea of what you’ll need.
Here are the core items:
- Raspberry PI 3 A+ (Note: Adafruit docs state, “Works best with Raspberry Pi model A+, B+, or Pi 2, but can be used with a model A or B if you purchase a 2×13 extra-tall header and solder that instead of the 2×20″
- PI power source (micro USB)
- Adafruit DC & Stepper Motor HAT for Raspberry Pi and power source, optional: Female DC power adapter (optional, makes easier to power the HAT)
- Micro SD card, preferably a high-performance card like a SanDisk Extreme
- Stepper motor (your mileage may vary depending on curtain weight and requirements)
- Adafruit HTU21D-F Temperature & Humidity Sensor Breakout Board – STEMMA QT
- Adafruit BH1750 Light Sensor – STEMMA QT / Qwiic (or other supported sensor)
- Breadboarding wire bundle
Here are optional items to consider, depending on your own setup:
- Aluminum Flex Shaft Coupler – 5mm to 5mm (optional)
- Brass M2.5 Standoffs for Pi HATs – Black Plated – Pack (optional)
- GPIO Stacking Header for Pi A+/B+/Pi 2/Pi 3 – Extra-long 2×20 Pins (optional)
- STEMMA QT / Qwiic JST SH 4-pin Cable – 100mm Long (optional, but really useful)
- STEMMA QT / Qwiic JST SH 4-pin Cable with Premium Female Sockets – 150mm Long (optional again)
Software required
- Easiest, recommended route: join my balenaHub fleet
- Deploy a version to your own account with my repo (see the Deploy with balena step further below)
- A free balenaCloud account if you’re managing the project on your own (first ten devices are fully-featured and free)
- Something like balenaEtcher to flash the image to your device’s SD card
Deploying the project
Joining my fleet
I already have my project up and running on balenaHub, and everyone’s welcome to join. When you join an open fleet, you’re relying on the fleet owner (me in this case) to manage the code while you just enjoy using the software on your device(s). You’ll receive a prompt to select a device type, image type, and input Wi-Fi credentials if your device supports it (completely private and secure). Once you input these parameters, you can download an image for your device. Use something like balenaEtcher to flash the image onto your SD card, insert the card, power up the device, and in a few moments you’ll join the fleet.
Access the device’s local UI by visiting https://balena.local or using the local IP address of your device. Since this project also uses balenaSense, you can access that dashboard on port :81 of your device’s local IP address.
Deploy with balena
If you don’t want to join the open fleet, but want to try this project on your own, log into your balenaCloud account and click on this button:

You’ll be taken to your dashboard and a new application and release version will be created for you. Navigate the left-side UI to add a new device to the fleet and use a tool like balenaEtcher to flash the image onto your SD card, insert the card, power up the device, and in a few moments you’ll join the fleet.
Project assembly
If you don’t use STEMMA QT you can connect the pins used for I2C with single wires but it is messier. That is why I marked the STEMMA QT wires optional in the list.

Key: 1) PI power source (micro USB), 2) HAT power source, 3) Female DC power adapter (optional, makes easier to power the HAT), 4) Raspberry PI 3 A+, 5) Micro SD card, 6) Adafruit DC & Stepper Motor HAT for Raspberry Pi, 7) Stepper motor, 8) Aluminum Flex Shaft Coupler – 5mm to 5mm (optional), 9) Brass M2.5 Standoffs for Pi HATs – Black Plated – Pack (optional), 10) GPIO Stacking Header for Pi A+/B+/Pi 2/Pi 3 – Extra-long 2×20 Pins (optional), 11) STEMMA QT / Qwiic JST SH 4-pin Cable – 100mm Long (optional, but really useful), 12) STEMMA QT / Qwiic JST SH 4-pin Cable with Premium Female Sockets – 150mm Long (optional again), 13) Adafruit HTU21D-F Temperature & Humidity Sensor Breakout Board – STEMMA QT, 14) Adafruit BH1750 Light Sensor – STEMMA QT / Qwiic (or other supported sensor), 15) Breadboarding wire bundle
The assembled hardware looks similar (only one motor attached):

Using the app for the first time
Navigating the home tab
On the Home tab you can update the position of the curtain manually with a slider.


Opening the URL of your device an empty dashboard should appear, logo in the header and a bottom bar for navigation with three tabs, Home, Rules, and Motors. When the home page is empty, it suggests that you add motors on the motor tab.
Add (at least) one motor on the motors tab.


You should give it a recognizable name like “Blind position” or “Blind angle”, that name will show up on the Home tab.
Other parameters here to edit:
* Step length: how big movement is done by one step of your motor, you can measure it for example by rolling up a string next to a ruler.
* Full distance: the travel needed for tour curtain to get from fully closed to fully open.
* Layer no: you can stack 4 motorhats, this param is optional and defaulted to 1
At the given time the existing motors need to have unique {layer-motor} number pairs, meaning physically only one motor can be in one slot, the api rejects if you want to add a motor to an occupied slot.
* Motor no: on a motorhat (layer) you can have motor 1 and motor 2, defaulted to 1.
Creating rules for motors


When you have motors, then you can create rules for them on the rules tab. If there are sensors you can select a sensor for the rule or you can create cron based schedules.
Demo video
It’s a rough cut of a demo, but this shows the project in action.
Addressing some challenges
Controlling the motor required using a straightforward guide that I got directly from the site manufacturer. They make a convenient Python library, including examples. If you’re not familiar working with this environment, just a note here those examples are not showing you the dependencies. The library used is adafruit-circuitpython-motorkit, and to make it work, you need to have RPI.GPIO installed.
To ensure all of the above works, you need to have gcc and python3-dev(el) on the machine.
Developing the project’s logic locally, iterating fast, and then deploying to an ARM environment, and realizing that package is not available or you need to build from source and for that you need gigs of tools to be installed, is not the most welcomed surprise. Yep, I am looking at you SQlite.
Conflicting sensor rules, how to manage them, and how to mix them with timed rules.
Timed (cron) rules have priority above sensor rules. Sensor rules work one way, meaning if you set up one to close the curtains when the temperature goes above 30 C, it won’t open them if it goes back below 30. You need to set that up separately.
When the rule criteria is met, – in this example the temperature goes above 30 C -, the rule will be set as ‘active’ and gets executed. It will remain active until the temperature falls below the threshold. As said before, marking the rule inactive does not mean executing the opposite motor movement, setting the active flag is only for preventing repetitive execution of the same rule.
The advantage of a prebuilt setup versus the most versatile (ours 🙂 ) shows here. With the earlier you have everything until the curtain itself, here you need to figure out how to transfer the movement of the motor to the curtain or the blind. Here are some examples, and for most of them, I plan to provide 3D print designs (see next steps section).
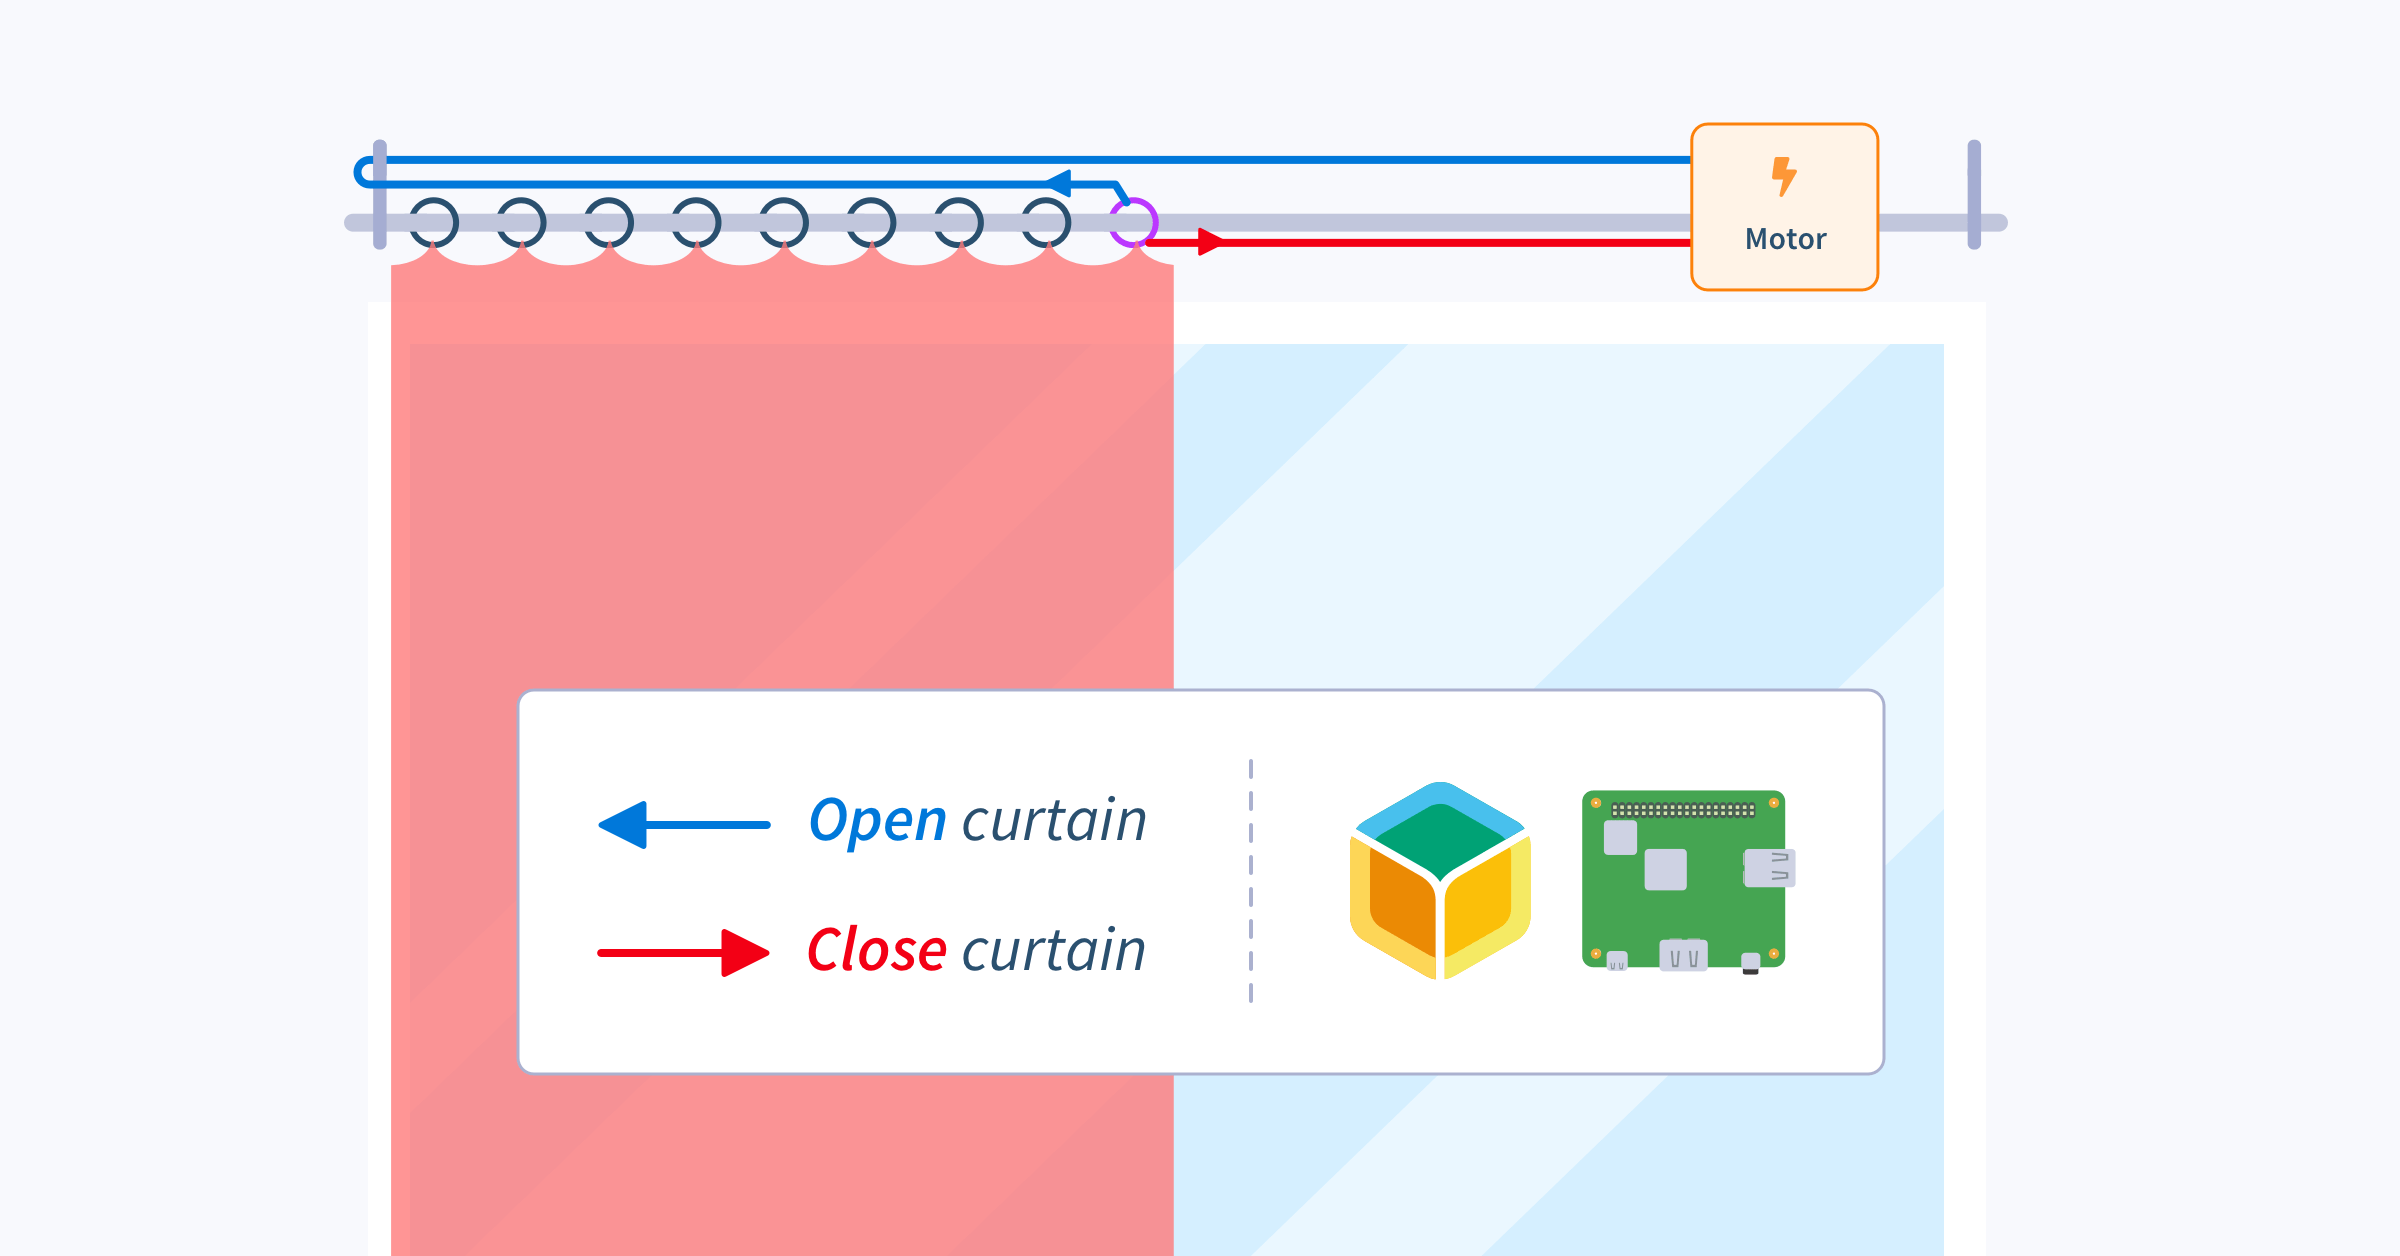
Most of my curtains are of a simple design, like on the first picture, or really similar, with two pieces of curtain. For each piece you want to move, you need one motor per fabric piece.

The orange objects in each diagram represents where I chose to put the motor, and red and blue arrows indicate closing and opening action. Closing (indicated with red) is easy. Just make the motor roll up a string connected to the curtain. However, notice that then opening the curtain (indicated with blue) the string cannot be pushed. Yes, you need a pulley on the other end to reverse the motion. You can make this setup move 2 pieces mirrored if you connect the second curtain somewhere around the alternating colored dots on the string.
Notes on vertical blinds
In this case, opening the curtain, to make this work, you need to fix the end of it marked with the blue cross.
Closing is still done by turning the motor in the reverse direction, but the work is done by gravity. Since working against gravity this needs exponential force from the motor putting it higher and getting closer to fully open.

Blinds already have the strings and pulleys so you really just need to connect the motors there, a good example for a two-motor setup. However, the strings should be included with the blind– I still marked them with red and blue to represent closing and opening, and to distinguish the action from lines that might indicate parts of the blinds.

Some tips here, the motors are constantly working against friction and gravity, so to make it easier for them:
- Choose the lightest curtain possible
- Make the path of the curtains as clear and as lubricated(?) as possible
- On the drawings it looks like the motors are directly connected to the thing to be moved, you can add gears to increase the force they can create
A closer look at the setup

The motor-driver and curtain-dashboard containers are the new blocks of this project, however the curtain-dashboard is quite specific the motor-driver can simplify your project if you are using this HAT, instead of starting from scratch with this container you can control your steppers through REST api. Just one request POST https://motor-driver with the payload { layer: 1, motor: 1, steps: 42} where the layer is the number of your HAT if you stacked more than one, the motor is the number of the motor on that layer so 1 or 2, and the steps is a number how many steps should the motor move to the default direction if positive and backwards if negative.
Other alternative usages
Automating parts of property management or assisted living
This can be a great addition to places where you need to automate these curtains from afar. These use cases include property management or assisted care facilities. We have many users and customers who are building solutions to help automate monitoring and care for those in need. With automated blinds, we can gently bring light into the room for a patient or someone in care, as well as make sure their curtains are closed before they need to sleep.
Taking care of plants
I can immediately think of my plant incubator for mangos and avocados that includes a particularly difficult plant, the lucky bamboo.

Mango likes warm places (30+ C), but does not like burning sun, it is sensitive to watering, it really does not like to be over-watered, and of course no plant likes to dry out. The top 1-2 cm of its soil should be kinda dry then deeper it is ok to be humid. High humidity also gives a chance for a special “anti-mango” fungus to attack the plant.
You see in the picture, that other pots (mostly with avocado inside) are covered to gather heat and humidity. Those guys really like the rainforest feeling.
Where I live during summer the temps are over 40C and the sunlight is burning you to ashes. Once I made a mistake with a mango, miscalculated where the shade will go by the time and the tip of the plant with a leaf got literally cremated in less than an hour.
So it is a tricky balance of getting the warm, but not all the power of the light, keeping the humidity at the right level for each of the pots. For the light control we already have the curtains/blinds automation, but the same way we can turn on and off a water source based on humidity readings in the soil or move a cover in a similar way based on air humidity.
What’s next?
There are a number of improvements that I’d like to work on next. Check them out:
- Add UI to help user adding “inverse” rule
- Case, mount (3d print)
- Portable battery
- Response/feedback from motor to the dashboard if the movement is done
(keep ui in sync with motors (servo)) - Notification or log history when rules were executed
- Automated motor detection
- Gather data, do ML
- Connect to home assistant
- Curtain setup guides (physical)
- Sensor mesh – decide to control the heat/light in the room based on data from further away from the actual window
There are countless possibilities to improve this project. The original idea was to create something that is easy to apply anywhere, or easy to modify in order to make it easy to apply anywhere. I’m hoping that people try this project out, including my own continued usage, so that I can get more feedback to improve it.
Want to help? Get in touch via the Comments section below! If you try this out, let us know in the comments, on our Forums, or on social media.